Wednesday, September 27, 2017
Decorative Stacked Pumpkins
Stacked pumpkin tutorial:
1. Here are the supplies I used:
I found this planter that someone threw out and I purchased the plastic pumpkins at the end of the season last year at Walgreen's for 15 cents a piece.
2. I painted the planter black and let it dry.
3. Now to paint the pumpkins. The pumpkins have faces but if I turned them around, I could not see them and they looked good from the front. I painted one of them white and then painted black stripes down the sides. I just free-handed the stripes.
4. For the second pumpkin, I spray painted it white and then added some gold circles. I glued them on.
5. For the last pumpkin, I left it orange and painted black diamonds around.
6. Now it is time to put it together. I added a couple of boards to the top of the planter so the pumpkins could rest on it. I wedged a long piece in and then added two pieces on each side. Since the plastic gives and there is a lip, it was easy to wedge them in.
7.Next I added some black gauze that I bought at the Dollar Tree. This would hide my wood. You could use some black fabric instead.
8. Now it is time to stack the pumpkins. I placed one on top of another. Because of the rims on the pumpkins, they stick together. You could glue them together but I wanted to be able to take them apart so I can store them easier.
9. For the top one, I added some flower foam into the top and wedged a stick between the two of them for the topper.
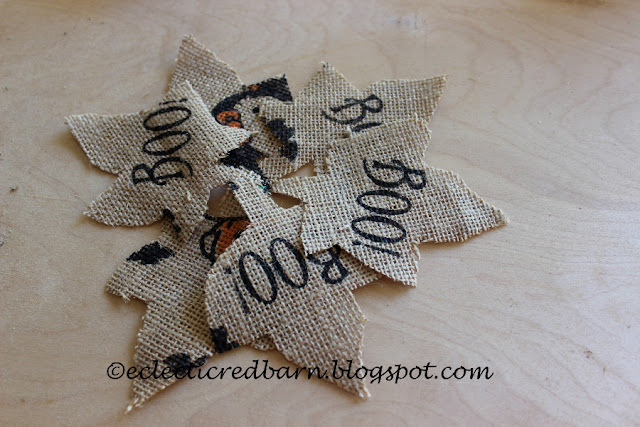
10. I cut out the words "Boo" from Halloween burlap that I used to make a Hello Kitty Halloween bag. I cut them into leaf shapes.
11. I glued them to the top pumpkin.
12. Finally, I added a bow to the top pumpkin and my stacked pumpkins were finished.
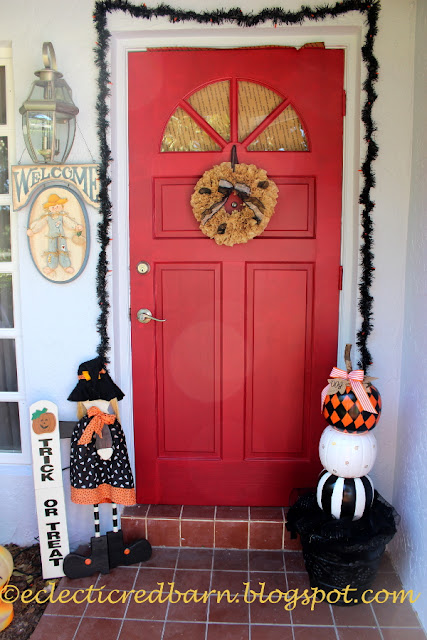
Here is my stacked pumpkins by the front door.
The post Decorative Stacked Pumpkin first appeared on Eclectic Red Barn.

Linking to these parties:


 >
>


Labels:
fall decor
,
Halloween decor
,
Halloween Front Entry
,
toparies
Subscribe to:
Post Comments
(
Atom
)


These are adorable and love how you make this look so easy. Thank you for sharing and we loved your pumpkins so much you are one of our features this coming Sunday. Thank you for sharing.
ReplyDeleteVanessa,
DeleteThank you so much for the feature. That is so kind. I really love how it turned out.
have a lovely weekend,
Bev
Cute idea!
ReplyDeletePatti,
DeleteSo sweet of you to like my Decorative Stacked Pumpkins.
Have a great week,
Bev
Hi Beverly! We all absolutely love your decorative stacked pumpkins! So fun and creative. Thank you so much for sharing with us at Dishing It & Digging It & congratulations on being featured this week!
ReplyDeleteAngie,
DeleteWhat a surprise to be featured. I loved how it turned out.
Thanks and hope you have a wonderful weekend,
Bev
You did a great job. It turned out really nice....Christine
ReplyDeleteChristine,
DeleteThank you for the lovely comment. I was really happy the way they turned out.
Hugs,
Bev
Love this idea. The designs you used on the pumpkins are so fun! I'm bringing back my Monday link party @ DIY Home Sweet Home (first one will be Oct. 16th) and I would love for you to stop by and link up your stacked pumpkins or any new projects your working on! http://diyhshp.blogspot.com
ReplyDeleteWould you please come to my home and build me one :) I think this is a great way to decorate for the holidays - through Thanksgiving. Great idea and thanks for the detailed instructins.
ReplyDeleteEmme,
DeleteThank you for the sweet comment. It is one of my favorite things that I have done. I would love to come and make one for you.
Hugs,
Bev
I actually think I could do this!!
ReplyDeleteJust an idea, for those that have porches open to the wind, you could place rocks or bricks in the planter to keep it from blowing over and getting damaged.
This is not a hard project. I know you could do it. We had some wind yesterday and I put some golf balls in the pumpkins and that worked fine.
DeleteHugs,
Bev
This is way better than spending $200.00. I love this and you really did a fantastic job.
ReplyDeleteThis is such a great way to use the cheapy dollar store pumpkins and make them look much fancier.
ReplyDeleteElise,
DeleteThanks for the sweet comment. Those plastic pumpkins are everywhere and I needed to make them better.
Have a great weekend.
Bev
Thanks for linking up at Create, Bake, Grow & Gather this week Beverly.
ReplyDelete