Monday, October 19, 2015
Hello Kitty Halloween Tote Tutorial
As I was in line to get my material cut, another lady, also in line asked what I was going to do with the fabric. I told her and she thought it was a good idea so she bought some too.
I almost forgot about the fabric until last week.
Making this tote bag wasn't hard. Let's get started.
Materials:
- 1/2 yard would be enough for this bag
- 1/2 yard lining material
- 40 inches of canvas strap or a material strap(made from your fabric)
- thread
- rotary cutter or scissorsDirections:
If you have never cut burlap before, it can be a little tricky. The best way to do it is to pull a thread completely out of the burlap. This will create a straight line for you to cut on. You can see here that there is a space where the thread used to be. Now you can cut down this strip and your burlap will be straight.
Cut out your fabrics. For this tote, I cut two 16" X 14" rectangles of the Hello Kitty burlap fabric and a yellow lining fabric. I made two 20" strap lengths.
* If you are using a lightweight fabric, you may want to cut some interfacing to re-enforce the fabric.
On the long side of the rectangles, cut a 2" x 2" square from the bottom of each corner. This will become the base of the tote. I cut a 2"x2" square from a cereal box and used it to make my cuts. This way all of my cuts would be the same.
Here is what it should look like when cut.
If you are adding interfacing to your fabric, you need to add it at this time.Put the right sides together and sew the two sides and bottom, but NOT the top or the cut corners.
Do the same for the lining - pin right sides together and sew sides and bottom.
Creating the bottom corners:
Grab those cut out corners and line up the side and bottom seams to meet in the middle and pin together.
The two stitched parts should be pinned together.
Once it is stitched, the corners would be squared off and look like this.
Remember to always press your seams as you go. This will make your bag have a finished look. Do the same for the burlap fabric.
Once you have both lining and main fabric sewn, place the right side of the lining inside the right side of the main fabric. In my case the Hello Kitty burlap.
Now, pin the two fabrics together at the top.
I have moved the lining down so you can see where I have pieced it. If you are using canvas straps, they are ready to use. If you want to make your own, then cut 20 inches of your fabric about 4 inches wide.
Fold the fabric in half and stitch together. Turn and press.
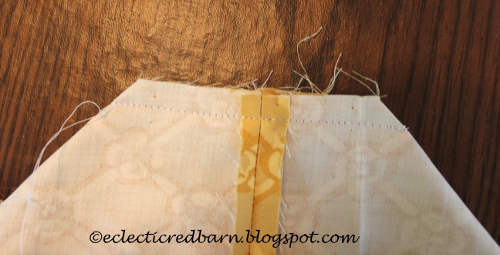
Place your straps down between the inner and outer fabrics, the ones that are pinned together. You want the two edges of the strap to face the front and two to face the back. I pinned them about 3 1/2 to 4 inches from the side seams. You can vary the strap locations to meet your needs.
You can see the straps have pins to hold them in place.
Now sew around the top of the bag starting at a side seam. I stitched about 1/2 - 3/4 inch from the top. Leave a 4 - 5 inch opening so you can turn your tote.
After you turn it, you will have the right side out and the lining on the inside. Pin the opening shut and top stitch all the way around the top of the bag. This will stitch up the opening and also re-enforce the straps.
Here is the corners that you made from the 2" cut out.
Although there are a number of steps to make this tote, it is not hard. This tote took about 1/2 hour to make. If you are not use to sewing, it may take a little longer.
You can always increase or decrease the size of the tote to meet your needs. I have made larger ones, but wanted this one to be smaller for my grand daughter.
I think this will be a good size for a 7 year old. It can hold lots of candy!
The post Hello Kitty Halloween Tote Tutorial first appeared on Eclectic Red Barn.
Labels:
craft
,
Halloween Bag
,
Hello Kitty
,
sewing
,
Tote Bag
,
Tutorial for making a tote
Subscribe to:
Post Comments
(
Atom
)


No comments :
Post a Comment
I would love to hear from you. Your comments are special to me.