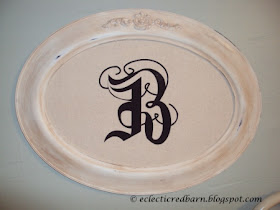
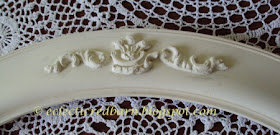
Here is my finished "B" frame, but it did not look like this when I purchased it.
You have probably seen this type of frame. They often had domed glass in them and were called Antique Oval Bubble Convex Glass Picture Frame. Mine did not have the bubble glass, thus the reason it was only $8 dollars. It was in relatively good shape.
It had a few chips on the inside and outside of the frame.
 Obviously the frame needed more than paint. I wanted some decorative trim at the top but didn't have anything that would work. So I guess I have to make my own. I have done this process on other frames to fix broken or missing trim.
Here is the mold that I created from plaster of Paris.
To create this mold you will need, baking clay, plaster of Paris, and an x-acto knife.
I use baking clay from the craft store. I cost about $2 but with a coupon, half that. You do NOT want to bake it when you have made your mold. It needs to be pliable so you can get the mold out.
I needed something to create the mold from. I decided to use a vintage oak frame that I fixed before, more on that frame in another post. This corner piece would be perfect along with another piece of trim.
Here is how I recreated this trim.
1. Open the clay and work it some so it is soft and pliable.
2. Lay the clay over the trim to copy and press down.
3. Make sure to press down to get a good imprint.
Here are my two molds.
4. Lift off the clay - carefully.5. Do NOT Bake!
6. Mix up some plaster of Paris according to the package directions.
7. Pour the plaster of Paris mixture into the mold.
8. Let set until dry. (Package states it should set from 20 - 30 minutes)
9. When dry, remove mold from clay - CAREFULLY.
10. Allow to set for a little while. I let them sit overnight since I was busy with other things, but you can use it after the stated time on the package .
Your trim has extra plaster of Paris around the edges and other places that needs to be trimmed up. Grab your x-acto knife and begin to scrap the mold carefully. Make small scrapes until you get what you want. This takes a little time, be patient. If part of your mold brakes, don't be too concerned. Once you place it on your piece, it won't matter. In fact, mine is in two pieces and the side pieces both broke in half.
Once you have your trim created, it is time to apply it to the frame. Now, in an ideal world the trim would be perfect and it would lay flat and be beautiful. NOT! This frame is rounded so when I tried to glue the side pieces, they both broke.
I used gorilla glue to apply it to the frame. Where it cracked, I applied a little chalking and used a toothpick to smooth it out. Can you see where it is cracked? It isn't perfect, but I like it.
On to distressing and waxing. I applied Ce Ce Caldwell aging wax. Here I begin to apply the wax and then rub off what I don't want.
Once I had the wax the way I wanted it, I distressed the frame and then buffed it. The frame is looking great , what to put on the inside?
I found a fancy letter B for Beverly. Perfect! I printed it out and sketched it onto some canvas. I don't have any pictures of this because I was "just practicing" ! Who knew that it would turn out so good. Well, there you have it, a vintage picture frame updated with paint and molding. It is going in the barn when I get it done.
Linking up to these parties:


That turned out so great.
ReplyDeleteWell that's amazing, really. It turned out very nice!
ReplyDeleteI'm visiting today from Thursday's Favorite Things.
How lovely!!! Now following you from life on lakeshore drive blog hop, I invite you to visit my blog ♥ from México :)
ReplyDeleteThat's beautiful, Beverly! You really turned that frame into a embellished beauty. I love monograms, too.
ReplyDeleteWhat a beauty. I love trying new things and I will definitely try this molding. Thanks for sharing. New follower over from the blog hop party at Life on Lakeshore Drive.
ReplyDeleteWow! Great transformation! I love how you made the decorative element to add. I never would have thought of using Sculpey to make the mold. Really neat! Thanks so much for linking up at the Real Family Fun link party! Hope to see you next week.
ReplyDeleteKC
Beautiful! Love the embellishment that you made. It is just perfect! Life to the full! Melissa
ReplyDeleteI really like the idea of making your own molds to decorate your frames. Your monogram looks very pretty with the oval frame!
ReplyDeleteYou are amazing. Beautiful!
ReplyDeleteWhat a fantastic job Beverley. Thank you for linking up at Shabbilicious Friday.
ReplyDeleteI really like the idea of making your own frame to decorate I Really Love this site !! Very Beautiful Decoration for the Frame and I hope that soon it will have a design for tv in mirror . I am Interested just in case .. Keep it up posting a site ! Have a Nice Day .. Cheers :)!
ReplyDelete